5.2 ETCD环境安装、命令和编程实战
没有go环境的先参考 第二章节 《go 安装》先安装go语言环境。需要go 1.11以上的版本。建议先测试单机版本。
1 编译ETCD
http://c.biancheng.net/view/123.html
1.1 源码安装
安装好Golang环境: 见Golang环境配置
下载etcd
git clone https://gitee.com/hcrwang/etcd.git
设置源代理
go env -w GO111MODULE=on
go env -w GOPROXY=https://goproxy.cn,direct
进入etcd目录
cd etcd
下载release版本
git checkout release-3.4
go mod vendor
./build
在etcd/bin目录生成对应的执行文件 etcd和etcdctl
启动:
./etcd
https://github.com/etcd-io/etcd.git
2 go安装
olang官网下载地址: https://golang.google.cn/dl/
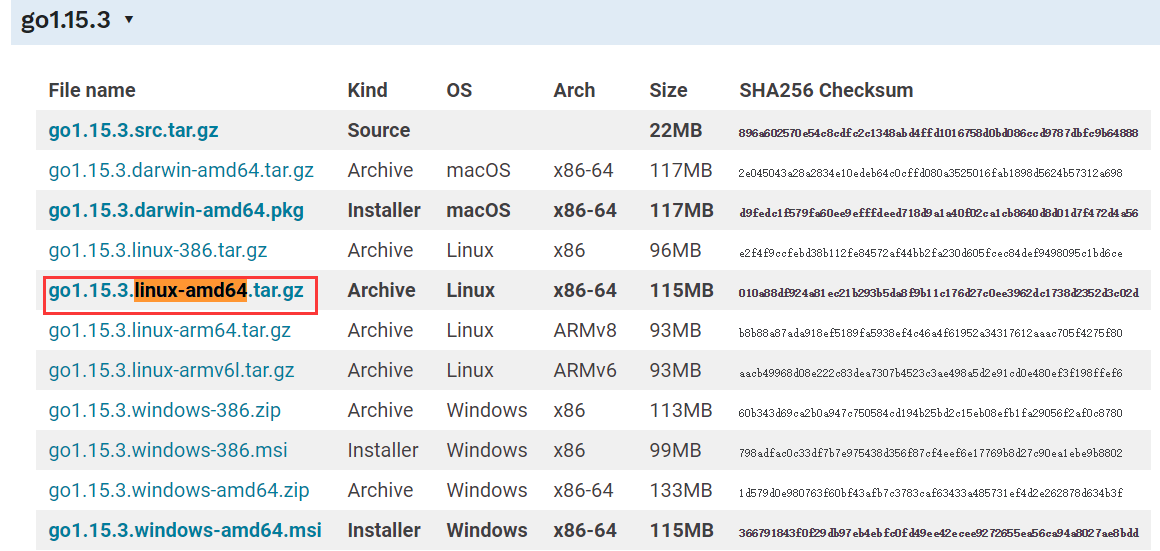
注意系统和版本的区别
1.打开官网下载地址选择对应的系统版本, 复制下载链接
wget https://dl.google.com/go/go1.15.3.linux-amd64.tar.gz
2.将其解压缩到/usr/local/(会在/usr/local中创建一个go目录)
tar -C /usr/local -xzf go1.15.3.linux-amd64.tar.gz
3.添加环境变量
vim /etc/profile
在打开的文件最后添加:
export GOPATH=~/go # 在home目录下的go目录
export GOROOT=/usr/local/go
export PATH=$PATH:/usr/local/go/bin
export PATH=$PATH:$GOPATH:$GOROOT:/bin
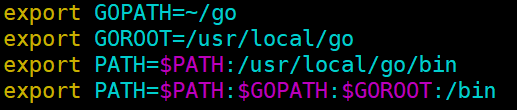
// wq保存退出后source一下
source /etc/profile
4.查看版本
go version

如果显示其他的版本,说明你自己已经安装过go,用which go命令查找

然后手动将/usr/bin/go删除。
5.测试使用
在你的工作区创建hello.go
package main
import "fmt"
func main() {
 fmt.Printf("hello, world\n")
}
构建项目(Then build it with the go tool)
go build hello.go
会生成一个名为hello的可执行文件
执行项目
$ ./hello
hello, world
If you see the “hello, world” message then your Go installation is working
官网版本使用介绍:https://golang.google.cn/doc/install?download=go1.15.3.linux-amd64.tar.gz (go1.15.3.linux-amd64.tar.gz版本)
3 Goproxy 配置go库代理
中国最可靠的 Go 模块代理。
Goproxy 中国完全实现了 Go 的模块代理协议。并且它是一个由中国备受信赖的云服务提供商七牛云支持的非营利性项目。我们的目标是为中国和世界上其他地方的 Gopher 们提供一个免费的、可靠的、持续在线的且经过 CDN 加速的模块代理。请在 status.goproxy.cn 订阅我们的有关系统性能的实时和历史数据。
请注意,Goproxy 中国只专注于服务在 https://goproxy.cn 的 Web 应用本身的开发。如果你正在寻找一种极其简单的方法来搭建你自己的 Go 模块代理,那么你应该看一下 Goproxy,Goproxy 中国就是基于它开发的。
愉快地编码吧,Gopher 们!;-)
注意,为了帮助 Gopher 们更好地去使用 Go 模块,Goproxy 中国现在支持回答和 Go 模块相关的所有问题(不再只是和 Go 模块代理相关的),你只需要遵循 Issue 模版将问题发表在这里即可。别忘了先去检查我们的常见问题页面中是否已经有了你想要询问的问题。
用法
Go 1.13 及以上(推荐)
打开你的终端并执行
$ go env -w GO111MODULE=on
$ go env -w GOPROXY=https://goproxy.cn,direct
完成。
macOS 或 Linux
打开你的终端并执行
$ export GO111MODULE=on
$ export GOPROXY=https://goproxy.cn
或者
$ echo “export GO111MODULE=on“ >> ~/.profile
$ echo “export GOPROXY=https://goproxy.cn“ >> ~/.profile
$ source ~/.profile
完成。
Windows
打开你的 PowerShell 并执行
C:\> $env:GO111MODULE = “on“
C:\> $env:GOPROXY = “https://goproxy.cn“
或者
1. 打开“开始”并搜索“env”
2. 选择“编辑系统环境变量”
3. 点击“环境变量…”按钮
4. 在“<你的用户名> 的用户变量”章节下(上半部分)
5. 点击“新建…”按钮
6. 选择“变量名”输入框并输入“GO111MODULE”
7. 选择“变量值”输入框并输入“on”
8. 点击“确定”按钮
9. 点击“新建…”按钮
10. 选择“变量名”输入框并输入“GOPROXY”
11. 选择“变量值”输入框并输入“https://goproxy.cn”
12. 点击“确定”按钮
完成。
常见问题
为什么创建 Goproxy 中国?
由于中国政府的网络监管系统,Go 生态系统中有着许多中国 Gopher 们无法获取的模块,比如最著名的 golang.org/x/...。并且在中国大陆从 GitHub 获取模块的速度也有点慢。因此,我们创建了 Goproxy 中国,使在中国的 Gopher 们能更好地使用 Go 模块。事实上,由于 goproxy.cn已通过 CDN 加速,所以其他国家的 Gopher 们也可以使用它。
使用 Goproxy 中国是否安全?
当然,和所有其他的 Go 模块代理一样,我们只是将模块原封不动地缓存起来,所以我们可以向你保证它们绝对不会在我们这边被篡改。不过,如果你还是不能够完全信任我们,那么你可以使用最值得信任的校验和数据库 sum.golang.org 来确保你从我们这里获取的模块没有被篡改过,因为 Goproxy 中国已经支持了代理校验和数据库。
Goproxy 中国在中国是合法的吗?
Goproxy 中国是一个由商业支持的项目而不是一个个人项目。并且它已经 ICP 备案在中华人民共和国工业和信息化部(ICP 备案号:沪ICP备11037377号-56),这也就意味着它在中国完全合法。
为什么不使用 proxy.golang.org?
因为 proxy.golang.org 在中国大陆被屏蔽了,所以,不使用。但是,如果你不在中国大陆,那么我们建议你优先考虑使用 proxy.golang.org,毕竟它看起来更加官方。一旦你进入了中国大陆,我们希望你能在第一时间想到 goproxy.cn,这也是我们选择 .cn 作为域名后缀的主要原因。
谁将回答我在这里询问的问题?
Goproxy 中国的成员以及我们伟大的 Go 社区中热心肠的志愿者们。请牢记,为了减轻他人的工作量,别忘了先去检查我们的常见问题页面中是否已经有了你想要问的问题。
别忘了查看我们的常见问题页面以获取更多的内容。
功劳
- 赞助商:七牛云
- 推动者:许式伟(七牛云的创始人兼首席执行官)、陶纯堂、茅力夫和陈剑煜
4 etcd单机启动
网上到处都是怎么启动etcd集群模式,很少有人介绍如何启动单机模式
sudo ./etcd --data-dir ./data.etcd/ --listen-client-urls http://0.0.0.0:2379 --advertise-client-urls http://0.0.0.0:2379 --enable-v2 & >./log/etcd.log
-listen-client-urls
用于指定etcd和客户端的连接端口
-advertise-client-urls
用于指定etcd服务器之间通讯的端口
etcd有要求,如果-listen-client-urls被设置了,那么就必须同时设置-advertise-client-urls,所以即使设置和默认相同,也必须显式设置.
172.17.0.13
5步完成etcd单机集群部署
5.1 下载 etcd
相关版本在:https://github.com/etcd-io/etcd/releases/
这里以ubuntu x64举例:
wget https://github.com/etcd-io/etcd/releases/download/v3.4.0-rc.3/etcd-v3.4.0-rc.3-linux-amd64.tar.gz
5.2 创建如下目录结构
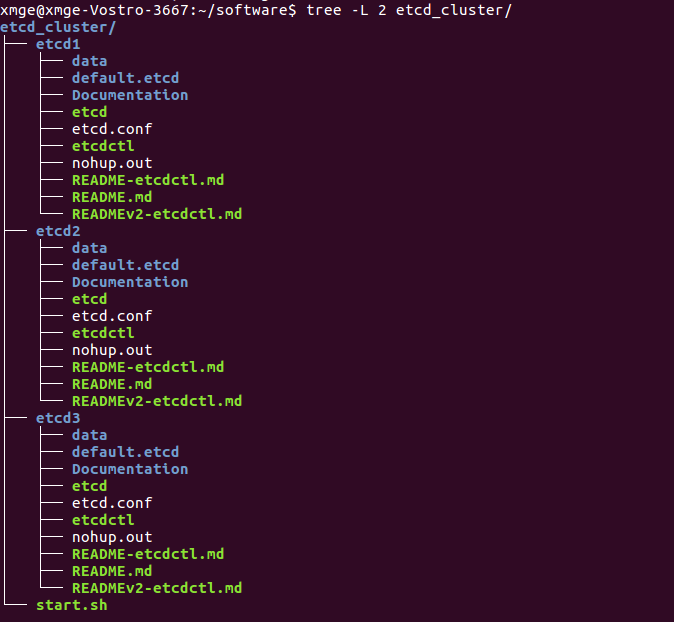
5.3 新增三个配置文件
etcd1/etcd.conf 配置文件:
name: etcd-1
data-dir: /home/xmge/show/etcd_cluster/etcd1/data   // 需要指定自己目录下的位置
listen-client-urls: http://0.0.0.0:2379
advertise-client-urls: http://127.0.0.1:2379
listen-peer-urls: http://0.0.0.0:2380
initial-advertise-peer-urls: http://127.0.0.1:2380
initial-cluster: etcd-1=http://127.0.0.1:2380,etcd-2=http://127.0.0.1:2480,etcd-3=http://127.0.0.1:2580
initial-cluster-token: etcd-cluster-my
initial-cluster-state: new
etcd2/etcd.conf 配置文件:
name: etcd-2
data-dir: /home/xmge/show/etcd_cluster/etcd2/data   // 需要指定自己目录下的位置
listen-client-urls: http://0.0.0.0:2479
advertise-client-urls: http://127.0.0.1:2479
listen-peer-urls: http://0.0.0.0:2480
initial-advertise-peer-urls: http://127.0.0.1:2480
initial-cluster: etcd-1=http://127.0.0.1:2380,etcd-2=http://127.0.0.1:2480,etcd-3=http://127.0.0.1:2580
initial-cluster-token: etcd-cluster-my
initial-cluster-state: new
etcd3/etcd.conf 配置文件:
name: etcd-3
data-dir: /home/xmge/show/etcd_cluster/etcd3/data   // 需要指定自己目录下的位置
listen-client-urls: http://0.0.0.0:2579
advertise-client-urls: http://127.0.0.1:2579
listen-peer-urls: http://0.0.0.0:2580
initial-advertise-peer-urls: http://127.0.0.1:2580
initial-cluster: etcd-1=http://127.0.0.1:2380,etcd-2=http://127.0.0.1:2480,etcd-3=http://127.0.0.1:2580
initial-cluster-token: etcd-cluster-my
initial-cluster-state: new
5.4 新增启动脚本start.sh并启动
#!/bin/bash
CRTDIR=$(pwd)
servers=("etcd1" "etcd2" "etcd3")
for server in ${servers[@]}
do
        cd ${CRTDIR}/$server
        nohup ./etcd --config-file=etcd.conf &
        echo $?
done
启动集群
chmod +x start.sh
./start.sh
5.5 检验集群是否启动成功

6 etcd命令行接口使用
获取etcd的版本号
curl -L http://127.0.0.1:2379/version

健康状态
curl -L http://127.0.0.1:2379/health
{“health“:“true“}
设置一个key的value
curl http://127.0.0.1:2379/v2/keys/message -XPUT -d value=”Hello world”

获取一个key的value
curl http://127.0.0.1:2379/v2/keys/message

改变一个key的value
curl http://127.0.0.1:2379/v2/keys/message -XPUT -d value=”Hello etcd”

删除一个key节点
curl http://127.0.0.1:2379/v2/keys/message -XDELETE

使用ttl(即设置一个key的值并给这个key加一个生命周期,当超过这个时间该值没有被访问则自动被删除)
curl http://127.0.0.1:2379/v2/keys/foo -XPUT -d value=bar -d ttl=5
等待一个值的变化
curl http://127.0.0.1:2379/v2/keys/foo?wait=true
该命令调用之后会阻塞进程,直到这个值发生变化才能返回,当改变一个key的值,或者删除等操作发生时,该等待
就会返回
特别注意,在变化发生度较高的情况下,最好把这种变化结果交给另外一个线程来处理,监控线程立即返回继续监控变化情况,当然etcd也提供了获取历史变化的命令,这个命令仅为丢失监听事件的情况下的补救方案。
创建一个目录
curl http://127.0.0.1:2379/v2/keys/dir -XPUT -d dir=true
列举一个目录
curl http://127.0.0.1:2379/v2/keys/dir
递归列举一个目录
curl http://127.0.0.1:2379/v2/keys/dir?recursive=true
到这里我们可以组合以上的诸多用法实现自己想要的功能。例如监控一个目录下的所有key的变化,包括子目录的。可以使用命令:
curl http://127.0.0.1:2379/v2/keys/dir?recursive=true&wait=true
删除一个目录
curl ‘http://127.0.0.1:2379/v2/keys/dir?dir=true’ -XDELETE
命令行接口就介绍这么多,详细可以参考下载的安装包里文档里面的api.md文件有更加详细的介绍。
7 etcdAPI 文档
etcd 对外通过 HTTP API 对外提供服务,这种方式方便测试(通过 curl 或者其他工具就能和 etcd 交互),也很容易集成到各种语言中(每个语言封装 HTTP API 实现自己的 client 就行)。
下面介绍下 etcd 通过 HTTP API 提供了哪些功能,并使用 httpie 来交互(当然你也可以使用 curl 或者其他工具)。
1.获取 etcd 服务的版本信息
ubuntu@VM-0-13-ubuntu:~$ http http://127.0.0.1:2379/version
HTTP/1.1 200 OK
Access-Control-Allow-Headers: accept, content-type, authorization
Access-Control-Allow-Methods: POST, GET, OPTIONS, PUT, DELETE
Access-Control-Allow-Origin: *
Content-Length: 45
Content-Type: application/json
Date: Tue, 27 Oct 2020 06:46:25 GMT

{
    "etcdcluster": "3.4.0",
    "etcdserver": "3.4.13"
}
2.key 的新增
etcd 的数据按照树形结构组织,类似于 linux 的文件系统,也有目录和文件的区别,不过一般被称为 nodes。数据的 endpoint 都是以 /v2/keys 开头(v2 表示当前 API 的版本),比如 /v2/keys/names/cizixs。
要创建一个值,只要使用 PUT 方法在对应的 url endpoint 设置就行。如果对应的 key 已经存在, PUT 也会对 key 进行更新。
ubuntu@VM-0-13-ubuntu:~$ http PUT http://127.0.0.1:2379/v2/keys/message value=="hello, etcd"
HTTP/1.1 200 OK
Access-Control-Allow-Headers: accept, content-type, authorization
Access-Control-Allow-Methods: POST, GET, OPTIONS, PUT, DELETE
Access-Control-Allow-Origin: *
Content-Length: 189
Content-Type: application/json
Date: Tue, 27 Oct 2020 06:47:15 GMT
X-Etcd-Cluster-Id: cdf818194e3a8c32
X-Etcd-Index: 10
X-Raft-Index: 26
X-Raft-Term: 7

{
    "action": "set",
    "node": {
        "createdIndex": 10,
        "key": "/message",
        "modifiedIndex": 10,
        "value": "hello, etcd"
    },
    "prevNode": {
        "createdIndex": 8,
        "key": "/message",
        "modifiedIndex": 8,
        "value": "hello, etcd"
    }
}
上面这个命令通过 PUT 方法把 /message 设置为 hello, etcd。返回的格式中,各个字段的意义是:
action:请求出发的动作,这里因为是新建一个 key 并设置它的值,所以是set。node.key:key 的 HTTP 路径。
node.value:请求处理之后,key 对应的value值。node.createdIndex: createdIndex 是一个递增的值,每次有 key 被创建的时候会增加。
node.modifiedIndex:同上,只不过每次有 key 被修改的时候增加。
除返回的 json 体外,上面的情况还包含了一些特殊的 HTTP 头部信息,这些信息说明了 etcd cluster 的一些情况。它们的具体含义如下:
X-Etcd-Index:当前 etcd 集群的 index。X-Raft-Index:raft 集群的 index。
X-Raft-Term:raft 集群的任期,每次有 leader 选举的时候,这个值就会增加。
3.key的查看
查看信息比较简单,使用 GET 方法,url 指向要查看的值就行:
ubuntu@VM-0-13-ubuntu:~$ http GET http://127.0.0.1:2379/v2/keys/message
HTTP/1.1 200 OK
Access-Control-Allow-Headers: accept, content-type, authorization
Access-Control-Allow-Methods: POST, GET, OPTIONS, PUT, DELETE
Access-Control-Allow-Origin: *
Content-Length: 102
Content-Type: application/json
Date: Tue, 27 Oct 2020 06:48:27 GMT
X-Etcd-Cluster-Id: cdf818194e3a8c32
X-Etcd-Index: 10
X-Raft-Index: 26
X-Raft-Term: 7

{
    "action": "get",
    "node": {
        "createdIndex": 10,
        "key": "/message",
        "modifiedIndex": 10,
        "value": "hello, etcd"
    }
}
这里的 action 变成了 get,其他返回的值和上面的含义一样,略过不提。
NOTE:这两个命令并不是连着执行的,中间我有执行其他操作,因此 index 会出现不连续的情况。
4. key的更新
PUT 也可用来更新 key 的值。
ubuntu@VM-0-13-ubuntu:~$ http PUT http://127.0.0.1:2379/v2/keys/message value=="I'm changed"
HTTP/1.1 200 OK
Access-Control-Allow-Headers: accept, content-type, authorization
Access-Control-Allow-Methods: POST, GET, OPTIONS, PUT, DELETE
Access-Control-Allow-Origin: *
Content-Length: 191
Content-Type: application/json
Date: Tue, 27 Oct 2020 06:48:52 GMT
X-Etcd-Cluster-Id: cdf818194e3a8c32
X-Etcd-Index: 11
X-Raft-Index: 27
X-Raft-Term: 7

{
    "action": "set",
    "node": {
        "createdIndex": 11,
        "key": "/message",
        "modifiedIndex": 11,
        "value": "I'm changed"
    },
    "prevNode": {
        "createdIndex": 10,
        "key": "/message",
        "modifiedIndex": 10,
        "value": "hello, etcd"
    }
}
和第一次执行 PUT 命令不同的是,返回中多了一个字段 prevNode,它保存着更新之前该 key 的信息。它的格式和 node 是一样的,如果之前没有这个信息,这个字段会被省略。
5.删除 key
删除 key 可以通过 DELETE 方法。
ubuntu@VM-0-13-ubuntu:~$ http DELETE http://127.0.0.1:2379/v2/keys/message
HTTP/1.1 200 OK
Access-Control-Allow-Headers: accept, content-type, authorization
Access-Control-Allow-Methods: POST, GET, OPTIONS, PUT, DELETE
Access-Control-Allow-Origin: *
Content-Length: 172
Content-Type: application/json
Date: Tue, 27 Oct 2020 06:49:21 GMT
X-Etcd-Cluster-Id: cdf818194e3a8c32
X-Etcd-Index: 12
X-Raft-Index: 28
X-Raft-Term: 7

{
    "action": "delete",
    "node": {
        "createdIndex": 11,
        "key": "/message",
        "modifiedIndex": 12
    },
    "prevNode": {
        "createdIndex": 11,
        "key": "/message",
        "modifiedIndex": 11,
        "value": "I'm changed"
    }
}
注意,这里的 action 是 delete,并且 modifiedIndex 增加了,但是 createdIndex 没有变化,因为这是一个修改操作,不是新建操作。
6. 查看ttl
6.1 etcd 中,key 可以有 TTL 属性,若超过这个时间,就会被自动删除。
设置一个看看:
ubuntu@VM-0-13-ubuntu:~$ http PUT http://127.0.0.1:2379/v2/keys/tempkey value=="Gone with wind" ttl==5
HTTP/1.1 201 Created
Access-Control-Allow-Headers: accept, content-type, authorization
Access-Control-Allow-Methods: POST, GET, OPTIONS, PUT, DELETE
Access-Control-Allow-Origin: *
Content-Length: 159
Content-Type: application/json
Date: Tue, 27 Oct 2020 06:49:51 GMT
X-Etcd-Cluster-Id: cdf818194e3a8c32
X-Etcd-Index: 13
X-Raft-Index: 29
X-Raft-Term: 7

{
    "action": "set",
    "node": {
        "createdIndex": 13,
        "expiration": "2020-10-27T06:49:56.260714913Z",
        "key": "/tempkey",
        "modifiedIndex": 13,
        "ttl": 5,
        "value": "Gone with wind"
    }
}
除了一般 key 返回的信息之外,上面多了两个字段:
expiration:代表 key 过期被删除的时间ttl:表示 key 还要多少秒可以存活(这个值是动态的,会根据你请求的时候和过期时间进行计算)
如果我们在 5s 之后再去请求查看该 key,会发现报错信息:
ubuntu@VM-0-13-ubuntu:~$ http http://127.0.0.1:2379/v2/keys/tempkey
HTTP/1.1 404 Not Found
Access-Control-Allow-Headers: accept, content-type, authorization
Access-Control-Allow-Methods: POST, GET, OPTIONS, PUT, DELETE
Access-Control-Allow-Origin: *
Content-Length: 74
Content-Type: application/json
Date: Tue, 27 Oct 2020 06:50:32 GMT
X-Etcd-Cluster-Id: cdf818194e3a8c32
X-Etcd-Index: 14

{
    "cause": "/tempkey",
    "errorCode": 100,
    "index": 14,
    "message": "Key not found"
}
http 返回为 404,并且返回体中给出了 errorCode 和错误信息。
6.2 TTL 也可通过 PUT 方法进行取消,只要设置空值 ttl= 就行,这样 key 就不会过期被删除。比如:
http PUT http://127.0.0.1:2379/v2/keys/foo value==bar ttl== prevExist==true
注意:需要设置 value==bar,不然 key 会变成空值。
6.3 如果只是想更新 TTL,可以添加上 refresh==true 参数:
http    PUT http://127.0.0.1:2379/v2/keys/tempkey value=="Gone with wind" ttl==200
http -v PUT http://127.0.0.1:2379/v2/keys/tempkey refresh==true
2.
3. HTTP/1.1 200 OK
4. Content-Length: 305
5. Content-Type: application/json
6. Date: Tue, 02 Aug 2016 06:05:12 GMT
7. X-Etcd-Cluster-Id: cdf818194e3a8c32
8. X-Etcd-Index: 20
9. X-Raft-Index: 35849
10. X-Raft-Term: 2
11.
12. {
13. "action": "set",
14. "node": {
15. "createdIndex": 20,
16. "expiration": "2016-08-02T06:13:32.370495212Z",
17. "key": "/tempkey",
18. "modifiedIndex": 20,
19. "ttl": 500,
20. "value": "hello, there"
21.     },
22. "prevNode": {
23. "createdIndex": 19,
24. "expiration": "2016-08-02T06:10:05.366042396Z",
25. "key": "/tempkey",
26. "modifiedIndex": 19,
27. "ttl": 293,
28. "value": "hello, there"
29.     }
30. }
7.监听变化
etcd 提供了监听的机制,可以让客户端使用 long pulling 方式来监听某个 key。当key发生变化的时候,可以接收到通知。因为 etcd 经常被用作服务发现,若集群中的信息有更新,需要及时被检测,做出对应的处理。因此,需要有监听机制,来告诉客户端特定 key 的变化情况。
监听动作只需要 GET 方法,添加上 wait=true 参数就行。使用 recursive=true 参数,也能监听某个目录。
ubuntu@VM-0-13-ubuntu:~$ http http://127.0.0.1:2379/v2/keys/foo wait==true
HTTP/1.1 200 OK
Access-Control-Allow-Headers: accept, content-type, authorization
Access-Control-Allow-Methods: POST, GET, OPTIONS, PUT, DELETE
Access-Control-Allow-Origin: *
Content-Type: application/json
Date: Tue, 27 Oct 2020 07:04:48 GMT
Transfer-Encoding: chunked
X-Etcd-Cluster-Id: cdf818194e3a8c32
X-Etcd-Index: 27
X-Raft-Index: 731
X-Raft-Term: 7
这个时候,客户端会阻塞在这里。如果有另外的 terminal 修改 key 的值,则监听的客户端会接收到消息,并打印出更新的值:
{
    "action": "set",
    "node": {
        "createdIndex": 28,
        "key": "/foo",
        "modifiedIndex": 28,
        "value": "I'm fuge"
    },
    "prevNode": {
        "createdIndex": 26,
        "key": "/foo",
        "modifiedIndex": 26,
        "value": "I'm changed"
    }
}
除了这种最简单的监听之外,还可以提供基于 index 的监听。如果通过 waitIndex 指定了 index,那么会返回从 index 开始出现的第一个事件,这包含了两种情况:
- 给出的 index 小于等于当前 index ,即事件已经发生,那么监听会立即返回该事件。
- 给出的 index 大于当前 index,等待 index 之后的事件发生并返回。
目前 etcd 只会保存最近 1000 个事件(整个集群范围内),再早之前的事件会被清理。如果监听被清理的事件,则会报错。如果出现漏过太多事件(超过 1000)的情况,需要重新获取当然的 index 值(X-Etcd-Index),然后从 X-Etcd-Index+1 开始监听。
因为在监听的时候出现事件就会直接返回,所以需要客户端编写循环逻辑,保持监听状态。在两次监听的间隔中出现的事件,很可能被漏过。所以,最好把事件处理逻辑做成异步的,不要阻塞监听逻辑。
注意:监听 key 时会出现“长时间没有返回,导致连接被 close ”的情况,客户端需要处理这种错误,并自动重试。
8.自动创建有序的 keys
在有些情况下,我们需要 key 是有序的,etcd 提供了这个功能。对某个目录使用 POST 方法,能自动生成有序的 key,这种模式可以用于队列处理等场景。
buntu@VM-0-13-ubuntu:~$ http POST http://127.0.0.1:2379/v2/keys/queue value==job1
HTTP/1.1 201 Created
Access-Control-Allow-Headers: accept, content-type, authorization
Access-Control-Allow-Methods: POST, GET, OPTIONS, PUT, DELETE
Access-Control-Allow-Origin: *
Content-Length: 117
Content-Type: application/json
Date: Tue, 27 Oct 2020 07:06:09 GMT
X-Etcd-Cluster-Id: cdf818194e3a8c32
X-Etcd-Index: 29
X-Raft-Index: 734
X-Raft-Term: 7

{
    "action": "create",
    "node": {
        "createdIndex": 29,
        "key": "/queue/00000000000000000029",
        "modifiedIndex": 29,
        "value": "job1"
    }
}
创建的 key 会使用 etcd index,只能保证递增,无法保证是连续的(因为在两次创建之间,可能会有其他事件发生)。用相同的命令创建多个值,在获取值的时候,使用 sorted=true参数,就会返回已经排序的值:
ubuntu@VM-0-13-ubuntu:~$ http http://127.0.0.1:2379/v2/keys/queue sorted==true
HTTP/1.1 200 OK
Access-Control-Allow-Headers: accept, content-type, authorization
Access-Control-Allow-Methods: POST, GET, OPTIONS, PUT, DELETE
Access-Control-Allow-Origin: *
Content-Length: 189
Content-Type: application/json
Date: Tue, 27 Oct 2020 07:06:50 GMT
X-Etcd-Cluster-Id: cdf818194e3a8c32
X-Etcd-Index: 29
X-Raft-Index: 734
X-Raft-Term: 7

{
    "action": "get",
    "node": {
        "createdIndex": 29,
        "dir": true,
        "key": "/queue",
        "modifiedIndex": 29,
        "nodes": [
            {
                "createdIndex": 29,
                "key": "/queue/00000000000000000029",
                "modifiedIndex": 29,
                "value": "job1"
            }
        ]
    }
}
9.设置目录的 TTL
和 key 类似,目录(dir)也可以有过期时间。设置的方法也一样,只不过多了 dir=true 参数来说明这是一个目录。
ubuntu@VM-0-13-ubuntu:~$ http PUT http://127.0.0.1:2379/v2/keys/dir dir==true ttl==5 prevExist==true
HTTP/1.1 404 Not Found
Access-Control-Allow-Headers: accept, content-type, authorization
Access-Control-Allow-Methods: POST, GET, OPTIONS, PUT, DELETE
Access-Control-Allow-Origin: *
Content-Length: 70
Content-Type: application/json
Date: Tue, 27 Oct 2020 07:07:29 GMT
X-Etcd-Cluster-Id: cdf818194e3a8c32
X-Etcd-Index: 29

{
    "cause": "/dir",
    "errorCode": 100,
    "index": 29,
    "message": "Key not found"
}
目录在过期的时候,会被自动删除,包括它里面所有的子目录和 key。所有监听这个目录中内容的客户端,都会收到对应的事件。
10.比较更新的原子操作
在分布式环境中,我们需要解决多个客户端的竞争问题,etcd 提供了原子操作 CompareAndSwap(CAS),通过这个操作可以很容易实现分布式锁。
简单来说,只有在客户端提供的条件成立的情况下,这个命令才会更新对应的值。目前支持的条件包括:
preValue:检查 key 之前的值是否和客户端提供的一致。prevIndex:检查 key 之前的modifiedIndex是否和客户端提供的一致。
prevExist:检查 key 是否已经存在。如果存在就执行更新操作,如果不存在,执行 create 操作。
举个例子,比如目前 /foo 的值为 bar,要把它更新成 changed,可以使用:
ubuntu@VM-0-13-ubuntu:~$ http PUT http://127.0.0.1:2379/v2/keys/foo prevValue==bar value==changed
HTTP/1.1 200 OK
Access-Control-Allow-Headers: accept, content-type, authorization
Access-Control-Allow-Methods: POST, GET, OPTIONS, PUT, DELETE
Access-Control-Allow-Origin: *
Content-Length: 182
Content-Type: application/json
Date: Tue, 27 Oct 2020 07:09:44 GMT
X-Etcd-Cluster-Id: cdf818194e3a8c32
X-Etcd-Index: 31
X-Raft-Index: 738
X-Raft-Term: 7

{
    "action": "compareAndSwap",
    "node": {
        "createdIndex": 30,
        "key": "/foo",
        "modifiedIndex": 31,
        "value": "changed"
    },
    "prevNode": {
        "createdIndex": 30,
        "key": "/foo",
        "modifiedIndex": 30,
        "value": "bar"
    }
}
如果提供的条件不对,会报 412 错误:
ubuntu@VM-0-13-ubuntu:~$ http PUT http://127.0.0.1:2379/v2/keys/foo prevValue==bar value==changed
HTTP/1.1 412 Precondition Failed
Access-Control-Allow-Headers: accept, content-type, authorization
Access-Control-Allow-Methods: POST, GET, OPTIONS, PUT, DELETE
Access-Control-Allow-Origin: *
Content-Length: 84
Content-Type: application/json
Date: Tue, 27 Oct 2020 07:08:40 GMT
X-Etcd-Cluster-Id: cdf818194e3a8c32
X-Etcd-Index: 29

{
    "cause": "[bar != I'm fuge]",
    "errorCode": 101,
    "index": 29,
    "message": "Compare failed"
}
注意:匹配条件是 prevIndex=0 的话,也会通过检查。
这些条件也可以组合起来使用,只有当都满足的时候,才会执行对应的操作。
11.比较删除的原子操作
和条件更新类似,etcd 也支持条件删除操作:只有在客户端提供的条件成立的情况下,才会执行删除操作。支持 prevValue 和 prevIndex 两种条件检查,没有 prevExist,因为删除不存在的值本身就会报错。
我们来删除上面例子中更新的 /foo ,先看一下提供的条件不对的情况:
ubuntu@VM-0-13-ubuntu:~$ http DELETE http://127.0.0.1:2379/v2/keys/foo prevValue==bar
HTTP/1.1 412 Precondition Failed
Access-Control-Allow-Headers: accept, content-type, authorization
Access-Control-Allow-Methods: POST, GET, OPTIONS, PUT, DELETE
Access-Control-Allow-Origin: *
Content-Length: 83
Content-Type: application/json
Date: Tue, 27 Oct 2020 07:10:20 GMT
X-Etcd-Cluster-Id: cdf818194e3a8c32
X-Etcd-Index: 31

{
    "cause": "[bar != changed]",
    "errorCode": 101,
    "index": 31,
    "message": "Compare failed"
}
如果提供的条件成立,对应的 key 就会被删除:
ubuntu@VM-0-13-ubuntu:~$ http DELETE http://127.0.0.1:2379/v2/keys/foo prevValue==changed
HTTP/1.1 200 OK
Access-Control-Allow-Headers: accept, content-type, authorization
Access-Control-Allow-Methods: POST, GET, OPTIONS, PUT, DELETE
Access-Control-Allow-Origin: *
Content-Length: 170
Content-Type: application/json
Date: Tue, 27 Oct 2020 07:10:40 GMT
X-Etcd-Cluster-Id: cdf818194e3a8c32
X-Etcd-Index: 32
X-Raft-Index: 740
X-Raft-Term: 7

{
    "action": "compareAndDelete",
    "node": {
        "createdIndex": 30,
        "key": "/foo",
        "modifiedIndex": 32
    },
    "prevNode": {
        "createdIndex": 30,
        "key": "/foo",
        "modifiedIndex": 31,
        "value": "changed"
    }
}
12.操作目录
12.1 创建操作目录
在创建 key 的时候,如果它所在路径的目录不存在,会自动被创建。所以,在多数情况下,我们不需要关心目录的创建。目录的操作和 key 的操作基本一致,唯一的区别是:需要加上 dir=true 参数,指明操作的对象是目录。
比如,如果想要显示地创建目录,可以使用 PUT 方法,并设置 dir=true:
ubuntu@VM-0-13-ubuntu:~$ http PUT http://127.0.0.1:2379/v2/keys/anotherdir dir==true
HTTP/1.1 201 Created
Access-Control-Allow-Headers: accept, content-type, authorization
Access-Control-Allow-Methods: POST, GET, OPTIONS, PUT, DELETE
Access-Control-Allow-Origin: *
Content-Length: 94
Content-Type: application/json
Date: Tue, 27 Oct 2020 07:11:21 GMT
X-Etcd-Cluster-Id: cdf818194e3a8c32
X-Etcd-Index: 33
X-Raft-Index: 741
X-Raft-Term: 7

{
    "action": "set",
    "node": {
        "createdIndex": 33,
        "dir": true,
        "key": "/anotherdir",
        "modifiedIndex": 33
    }
}
创建目录的操作不能重复执行,否则会报 HTTP 403 错误。
12.2 列出单个节点或目录下所有节点的信息
如果 GET 方法对应的 url 是目录的话,etcd 会列出该目录所有节点的信息(不需要指定 dir=true)。例如,要列出根目录下所有的节点:
ubuntu@VM-0-13-ubuntu:~$ http http://127.0.0.1:2379/v2/keys/
HTTP/1.1 200 OK
Access-Control-Allow-Headers: accept, content-type, authorization
Access-Control-Allow-Methods: POST, GET, OPTIONS, PUT, DELETE
Access-Control-Allow-Origin: *
Content-Length: 182
Content-Type: application/json
Date: Tue, 27 Oct 2020 07:12:01 GMT
X-Etcd-Cluster-Id: cdf818194e3a8c32
X-Etcd-Index: 33
X-Raft-Index: 741
X-Raft-Term: 7

{
    "action": "get",
    "node": {
        "dir": true,
        "nodes": [
            {
                "createdIndex": 33,
                "dir": true,
                "key": "/anotherdir",
                "modifiedIndex": 33
            },
            {
                "createdIndex": 29,
                "dir": true,
                "key": "/queue",
                "modifiedIndex": 29
            }
        ]
    }
}
12.3 递归列出目录下所有的值
如果要递归列出所有的值,只需添加上 recursive=true 参数:
ubuntu@VM-0-13-ubuntu:~$ http http://127.0.0.1:2379/v2/keys/\?recursive\=true
HTTP/1.1 200 OK
Access-Control-Allow-Headers: accept, content-type, authorization
Access-Control-Allow-Methods: POST, GET, OPTIONS, PUT, DELETE
Access-Control-Allow-Origin: *
Content-Length: 483
Content-Type: application/json
Date: Tue, 27 Oct 2020 07:13:40 GMT
X-Etcd-Cluster-Id: cdf818194e3a8c32
X-Etcd-Index: 36
X-Raft-Index: 744
X-Raft-Term: 7

{
    "action": "get",
    "node": {
        "dir": true,
        "nodes": [
            {
                "createdIndex": 35,
                "key": "/foo2",
                "modifiedIndex": 35,
                "value": "bar"
            },
            {
                "createdIndex": 36,
                "key": "/foo23",
                "modifiedIndex": 36,
                "value": "bar"
            },
            {
                "createdIndex": 33,
                "dir": true,
                "key": "/anotherdir",
                "modifiedIndex": 33
            },
            {
                "createdIndex": 29,
                "dir": true,
                "key": "/queue",
                "modifiedIndex": 29,
                "nodes": [
                    {
                        "createdIndex": 29,
                        "key": "/queue/00000000000000000029",
                        "modifiedIndex": 29,
                        "value": "job1"
                    }
                ]
            },
            {
                "createdIndex": 34,
                "key": "/foo",
                "modifiedIndex": 34,
                "value": "bar"
            }
        ]
    }
}
12.4 删除目录
和 linux 删除目录的设计一样,要区别空目录和非空目录。删除空目录很简单,使用 DELETE 方法,并添加上 dir=true 参数,类似于 rmdir。而对于非空目录,需要添加上 recursive=true,类似于 rm -rf。
ubuntu@VM-0-13-ubuntu:~$ http DELETE http://127.0.0.1:2379/v2/keys/queue dir==true
HTTP/1.1 403 Forbidden
Access-Control-Allow-Headers: accept, content-type, authorization
Access-Control-Allow-Methods: POST, GET, OPTIONS, PUT, DELETE
Access-Control-Allow-Origin: *
Content-Length: 78
Content-Type: application/json
Date: Tue, 27 Oct 2020 07:20:12 GMT
X-Etcd-Cluster-Id: cdf818194e3a8c32
X-Etcd-Index: 37

{
    "cause": "/queue",
    "errorCode": 108,
    "index": 37,
    "message": "Directory not empty"
}
目录下有key时提示 “Directory not empty”,可以递归删除
ubuntu@VM-0-13-ubuntu:~$ http DELETE http://127.0.0.1:2379/v2/keys/queue dir==true recursive==true
HTTP/1.1 200 OK
Access-Control-Allow-Headers: accept, content-type, authorization
Access-Control-Allow-Methods: POST, GET, OPTIONS, PUT, DELETE
Access-Control-Allow-Origin: *
Content-Length: 168
Content-Type: application/json
Date: Tue, 27 Oct 2020 07:24:53 GMT
X-Etcd-Cluster-Id: cdf818194e3a8c32
X-Etcd-Index: 38
X-Raft-Index: 749
X-Raft-Term: 8

{
    "action": "delete",
    "node": {
        "createdIndex": 29,
        "dir": true,
        "key": "/queue",
        "modifiedIndex": 38
    },
    "prevNode": {
        "createdIndex": 29,
        "dir": true,
        "key": "/queue",
        "modifiedIndex": 29
    }
}
13.成员管理
etcd 在 /v2/members 下保存着集群中各个成员的信息。
13.1 列表查看各个成员的信息
ubuntu@VM-0-13-ubuntu:~$ http http://127.0.0.1:2379/v2/members
HTTP/1.1 200 OK
Access-Control-Allow-Headers: accept, content-type, authorization
Access-Control-Allow-Methods: POST, GET, OPTIONS, PUT, DELETE
Access-Control-Allow-Origin: *
Content-Length: 131
Content-Type: application/json
Date: Tue, 27 Oct 2020 07:25:38 GMT
X-Etcd-Cluster-Id: cdf818194e3a8c32

{
    "members": [
        {
            "clientURLs": [
                "http://0.0.0.0:2379"
            ],
            "id": "8e9e05c52164694d",
            "name": "default",
            "peerURLs": [
                "http://localhost:2380"
            ]
        }
    ]
}
13.2 可以通过 POST 方法添加成员
curl http://10.0.0.10:2379/v2/members -XPOST \
  H "Content-Type: application/json" -d '{"peerURLs":["http://10.0.0.10:2380"]}'
13.3 可以通过 DELETE 方法删除成员
curl http://10.0.0.10:2379/v2/members/272e204152 -XDELETE
13.4 通过 PUT 更新成员的 peer url
1. curl http://10.0.0.10:2379/v2/members/272e204152 -XPUT \
2. -H "Content-Type: application/json" -d '{"peerURLs":["http://10.0.0.10:2380"]}'
14.查看集群数据信息
etcd 中还保存了集群的数据信息,包括节点之间的网络信息、操作的统计信息。
/v2/stats/leader会返回集群中 leader 的信息,以及 followers 的基本信息。/v2/stats/self会返回当前节点的信息。
/v2/state/store:会返回各种命令的统计信息。
15.隐藏的节点
etcd 中节点也可以是默认隐藏的,类似于 linux 中以“.”开头的文件或者文件夹,以 _ 开头的节点也是默认隐藏的,不会在列出目录的时候显示。只有知道隐藏节点的完整路径,才能够访问它的信息。
8 c++封装libcurl实现etcd数据操作
安装第三方库
安装jsoncpp
sudo apt-get install libjsoncpp-dev
get实现
libcurl为c语言提供了一套HTTP RESTful API例如要实现上面的获取一个值的方法:
#include <curl/curl.h>
#include <jsoncpp/json/json.h>
#include <iostream>

using namespace std;
using namespace Json;

size_t process_data(void *buffer, size_t size, size_t nmemb, void *user_p)
{
	/* 获取json的value */
	Value root;
	Value node;
	Reader reader;
	FastWriter writer;
	string json = (char*)buffer;

	if(!reader.parse(json, root))
	{
		cout << "parse json error" << endl;
		return 0;
	}
	string nodeString = writer.write(root["node"]);
	if(!reader.parse(nodeString, node))
	{
		cout << "parse json error" << endl;
		return 0;
	}

	cout << node["value"] << endl;

	return 0;
}

int main(int argc, char **argv)
{
	//初始化libcurl
	CURLcode return_code;
	return_code = curl_global_init(CURL_GLOBAL_SSL);
	if (CURLE_OK != return_code)
	{
		cerr << "init libcurl failed." << endl;
		return -1;
	}

	// 获取easy handle
	CURL *easy_handle = curl_easy_init();
	if (NULL == easy_handle)
	{
		cerr << "get a easy handle failed." << endl;
		curl_global_cleanup();

		return -1;
	}

	char * buff_p = NULL;

	// 设置easy handle属性
	curl_easy_setopt(easy_handle, CURLOPT_URL, "http://127.0.0.1/v2/keys/message1");
	curl_easy_setopt(easy_handle, CURLOPT_PORT, 2379);
	curl_easy_setopt(easy_handle, CURLOPT_WRITEFUNCTION, &process_data);
	curl_easy_setopt(easy_handle, CURLOPT_WRITEDATA, buff_p);

	// 执行数据请求
	curl_easy_perform(easy_handle);

	// 释放资源

	curl_easy_cleanup(easy_handle);
	curl_global_cleanup();

	return 0;
}
由于etcd返回的数据都是以json的形式,所以代码中还增加了一段对json的处理。
set实现
实现设置一个key的功能:
// set.cpp
// 编译:g++ -o set set.cpp -lcurl -ljsoncpp
#include <curl/curl.h>
#include <stdio.h>
#include <string.h>

int etcd_set(char *key, char *value, char *token)
{
#define URL_MAX_LEN 50
#define VALUE_LEN 1024

         //初始化libcurl
	CURLcode return_code;
	char etcd_url[URL_MAX_LEN];
    char etcd_value[VALUE_LEN];

        return_code = curl_global_init(CURL_GLOBAL_SSL);
	if (CURLE_OK != return_code)
	{
		//cerr << "init libcurl failed." << endl;
		printf("init libcurl failed\n");
		return -1;
	}

	sprintf(etcd_url, "http://127.0.0.1:2379/v2/keys%s", key);
	sprintf(etcd_value, "value=%s", value);

	// 获取easy handle
	CURL *easy_handle = curl_easy_init();
	if (NULL == easy_handle)
	{
		//cerr << "get a easy handle failed." << endl;
		printf("get a easy handle failed.\n");
		curl_global_cleanup();
		return -1;
	}

	// 设置easy handle属性
	curl_easy_setopt(easy_handle, CURLOPT_URL, etcd_url);
	curl_easy_setopt(easy_handle, CURLOPT_POST, 1);
	curl_easy_setopt(easy_handle, CURLOPT_POSTFIELDS, etcd_value);
	curl_easy_setopt(easy_handle, CURLOPT_CUSTOMREQUEST, "PUT");

	// 执行数据请求
	curl_easy_perform(easy_handle);

	// 释放资源
	curl_easy_cleanup(easy_handle);
	curl_global_cleanup();
	return 0;
}

int main(void)
{
	etcd_set("/message1", "darren", NULL);
	return 0;
}
watch实现
监控一个值的变化。这个在上面获取一个key的值的基础上来实现,只需要改变其url,其它不做改动即可。
// watch.cpp
// 编译:g++ -o watch watch.cpp -lcurl -ljsoncpp
#include <curl/curl.h>
#include <jsoncpp/json/json.h>
#include <iostream>

using namespace std;
using namespace Json;

size_t process_data(void *buffer, size_t size, size_t nmemb, void *user_p)
{
	/* 获取json的value */
	Value root;
	Value node;
	Reader reader;
	FastWriter writer;
	string json = (char*)buffer;

	if(!reader.parse(json, root))
	{
		cout << "parse json error" << endl;
		return 0;
	}
	string nodeString = writer.write(root["node"]);
	if(!reader.parse(nodeString, node))
	{
		cout << "parse json error" << endl;
		return 0;
	}

	cout << node["value"] << endl;

	return 0;
}

int main(int argc, char **argv)
{
	//初始化libcurl
	CURLcode return_code;
	return_code = curl_global_init(CURL_GLOBAL_SSL);
	if (CURLE_OK != return_code)
	{
		cerr << "init libcurl failed." << endl;
		return -1;
	}

	// 获取easy handle
	CURL *easy_handle = curl_easy_init();
	if (NULL == easy_handle)
	{
		cerr << "get a easy handle failed." << endl;
		curl_global_cleanup();

		return -1;
	}

	char * buff_p = NULL;

	// 设置easy handle属性
	curl_easy_setopt(easy_handle, CURLOPT_URL, "http://127.0.0.1/v2/keys/message1?wait=true");
	curl_easy_setopt(easy_handle, CURLOPT_PORT, 2379);
	curl_easy_setopt(easy_handle, CURLOPT_WRITEFUNCTION, &process_data);
	curl_easy_setopt(easy_handle, CURLOPT_WRITEDATA, buff_p);

	// 执行数据请求
	curl_easy_perform(easy_handle);

	// 释放资源

	curl_easy_cleanup(easy_handle);
	curl_global_cleanup();

	return 0;
}
以上是我实现的简单的etcd接口,读者可以通过本博客或者根据libcurl提供的http RESTful API来实现etcd支持的更多的接口。
另外,基于etcd的高级语言接口在GitHub上已有相当多的开源工程,读者感兴趣可以到这里去下载查看——>高级语言封装的etcd接口。
8 在系统中用etcd实现服务注册和发现
并将自己的信息以key,value形式(key:serviceId,value:ip地址、端口等信息)
在配置文件的时候,也写上对应的
- serverid
- ip
- port
在即时通讯项目:我们暂且这么命名xxxx-xxxxx,前面xxxx代表服务
0001 代表login_server
0002 代表msg_server
0003 代表route_server
0004 代表db_proxy_server
0005 代表file_server
0006 代表http_msg_server
0007 代表push_server
0008 代表msfs
后面xxxx四位代表对应服务机器的序号。
系统中实现服务注册与发现所需的基本功能有:
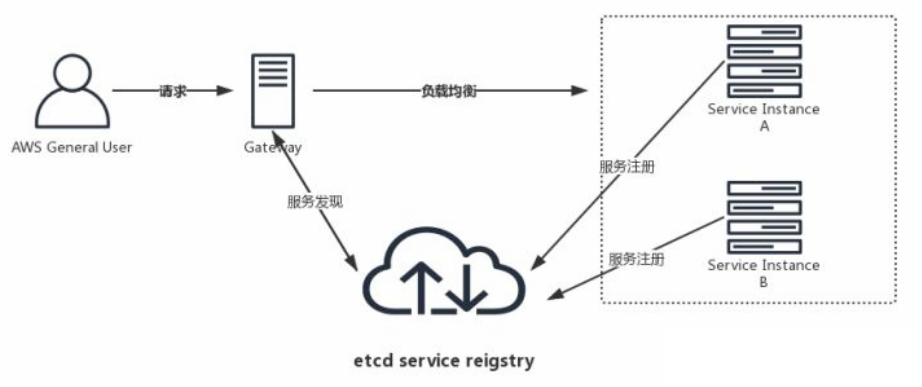
- 服务注册:同一service的所有节点注册到相同目录下,节点启动后将自己的信息注册到所属服务的目录中。
- 健康检查:服务节点定时发送心跳,注册到服务目录中的信息设置一个较短的TTL,运行正常的服务节点每隔一段时间会去更新信息的TTL。
- 服务发现:通过名称能查询到服务提供外部访问的 IP 和端口号。比如网关代理服务时能够及时的发现服务中新增节点、丢弃不可用的服务节点,同时各个服务间也能感知对方的存在。
在分布式系统中,如何管理节点间的状态一直是一个难题,etcd 是由开发并维护的,它使用 Go 语言编写,并通过Raft 一致性算法处理日志复制以保证强一致性。etcd像是专门为集群环境的服务发现和注册而设计,它提供了数据 TTL 失效、数据改变监视、多值、目录监听、分布式锁原子操作等功能,可以方便的跟踪并管理集群节点的状态。